Featured
If you’re looking to add some extra sparkle and glamour to your manicures, you’ve come to the right place. Swarovski crystals are renowned for their superior quality and brilliance, making them the perfect choice for creating stunning nail art that truly stands out. Whether you’re a seasoned nail artist or a DIY enthusiast, this guide will provide you with everything you need to know to take your nail game to the next level.
Why Swarovski Crystals?
So, why choose Swarovski crystals for your nail art? Well, for starters, Swarovski crystals are known for their unparalleled brilliance and clarity. Unlike other types of crystals or rhinestones, Swarovski crystals are precision-cut to maximize their sparkle, making them the ideal choice for creating eye-catching nail designs. You can purchase Swarovski crystals for nail art from Bluestreak Crystals.
Additionally, Swarovski offers a wide range of colors, shapes, and sizes, giving you endless possibilities for expressing your creativity. Whether you’re going for a bold and dramatic look or something more understated and elegant, Swarovski crystals have got you covered.
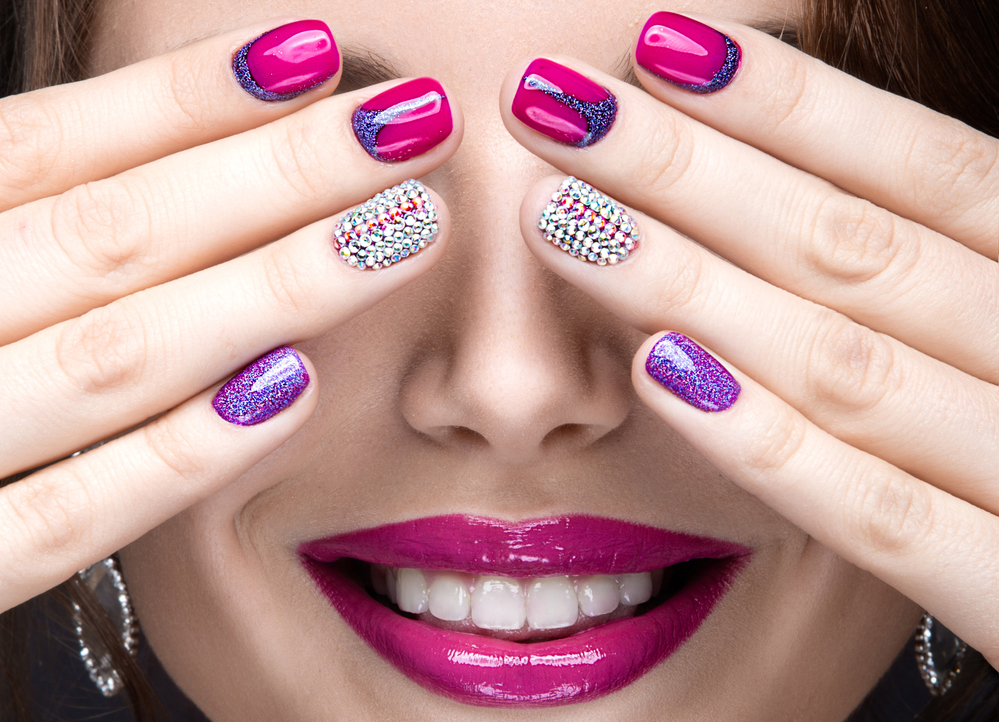
Need some inspiration to get those creative juices flowing? Take a look at these stunning examples of Swarovski crystal nail designs:
- Classic Elegance: For a timeless look, try pairing a nude base with delicate Swarovski crystals arranged in a simple yet sophisticated pattern.
- Playful Glamour: Add a pop of color to your nails with vibrant Swarovski crystals arranged in fun and playful designs, like flowers or butterflies.
- Intricate Detail: Get ready to wow with intricate nail art featuring Swarovski crystals arranged in intricate patterns and designs. The possibilities are endless!

It’s important to take proper care of it to ensure longevity. Here are a few tips to help you maintain your manicure:
- Avoid activities that may cause damage to your nails, such as excessive typing or using harsh chemicals without gloves.
- Apply a protective topcoat every few days to help seal and protect your design.
- If any crystals come loose, use a small amount of nail adhesive to reattach them.
- With proper care, your Swarovski crystal nail design can last up to two weeks or longer, so you can enjoy your glamorous manicure for as long as possible.
Best Practices for Offering Swarovski Crystals in Nail Designs
Would you like to branch out with your nail designs and add a unique element that will make your salon stand out from the competition? Well, you should consider using Swarovski crystals. The allure and sparkle of these crystals can be a fantastic addition and something that immediately catches the eye of clients. Whether they want to feel glamorous for a special occasion or they want to add some sparkle to their everyday look, Swarovski crystal nails can be the way to do it.
As a nail artist, you have to ensure you’re positioning the Swarovski crystals as best you can for durability and style. Here are some best practices so that you can ensure you always have happy and returning clients.
Buy Small Tweezers
First of all, you need to think about how you can position the Swarovski crystals onto the nails. The best tool you can use for this task is small tweezers. This is going to give you full control over where they’re positioned on the nail. After all, you don’t want to smudge the polish or touch other embellishments. Most nail artists find small tweezers the best way to put the Swarovski crystals into the design.
Get Quality Nail Glue
Of course, you need to make sure that the Swarovski crystals are help securely in place. The best solution for this is a quality nail glue. This is going to help hold the Swarovski crystals in position and allow the client to relax. They should not chip off as easily when you use a quality product.
Use a Clear Top Coat
While you can feel like the Swarovski crystals are securely in place with glue, you want to make sure that they’re not going to fall off at the first opportunity when clients are going around their daily routine. It’s recommended that you use a clear top coat, which is going to add some extra security. What’s more, it’s a great way to enhance their sparkle and improve the overall look of the nail design. Indeed, Swarovski crystals are known for their durability, but adding a quality clear top coat can add the cherry to the top of the cake.

Conclusion
And there you have it – the ultimate guide to incorporating Swarovski crystals into your nail art! Whether you’re a beginner or a seasoned pro, Swarovski crystals offer endless possibilities for creating stunning nail designs that are sure to turn heads. So why wait? Get creative, have fun, and let your nails sparkle and shine like never before with Swarovski crystals.
Image Credit: depositphotos.com